More AXIS Modules
Split Square Sum
Please Log In for full access to the web site.
Note that this link will take you to an external site (https://shimmer.mit.edu) to authenticate, and then you will be redirected back to this page.
More AXIS
For this week we want to build a couple more AXI Streaming (AXIS) modules. They'll fit into the pipeline spots shown below:

Once you're sure these modules are working in simulation, you'll move them over and make a very simple pipeline in the Pynq framework. At the high level you'll generate a time-series signal in Python (just like last week). You'll then send that down into the FPGA via a DMA transfer. You'll feed it into a FFT implementation (courtesy of Xilinx's IP catalog). The output of this will be 32 bits wide, but now will be comprised of complex numbers of sixteen bits in size. These two values will be stacked together into the 32 bit frame of our AXIS pipeline. We want to convert the complex output of our FFT to just its magnitude for plotting. This will involve finding the magnitude of this complex number. We'll do this in two stages. First we'll split the 32 bits, square the components, and then sum them. You'll do that on this page. Then you'll find their square root (on the next page).
Split-Square-Sum
This module will take in a 32 bit word that contains two 16 bit values representing a complex number. It should calculate the "sorta-magnitude" of that complex number, where "sorta" means you'll do everything but the square root part. This is done, of course, by squaring each value, and then summing them. We'll take care of the square-root portion in the next section. For now this is your task:
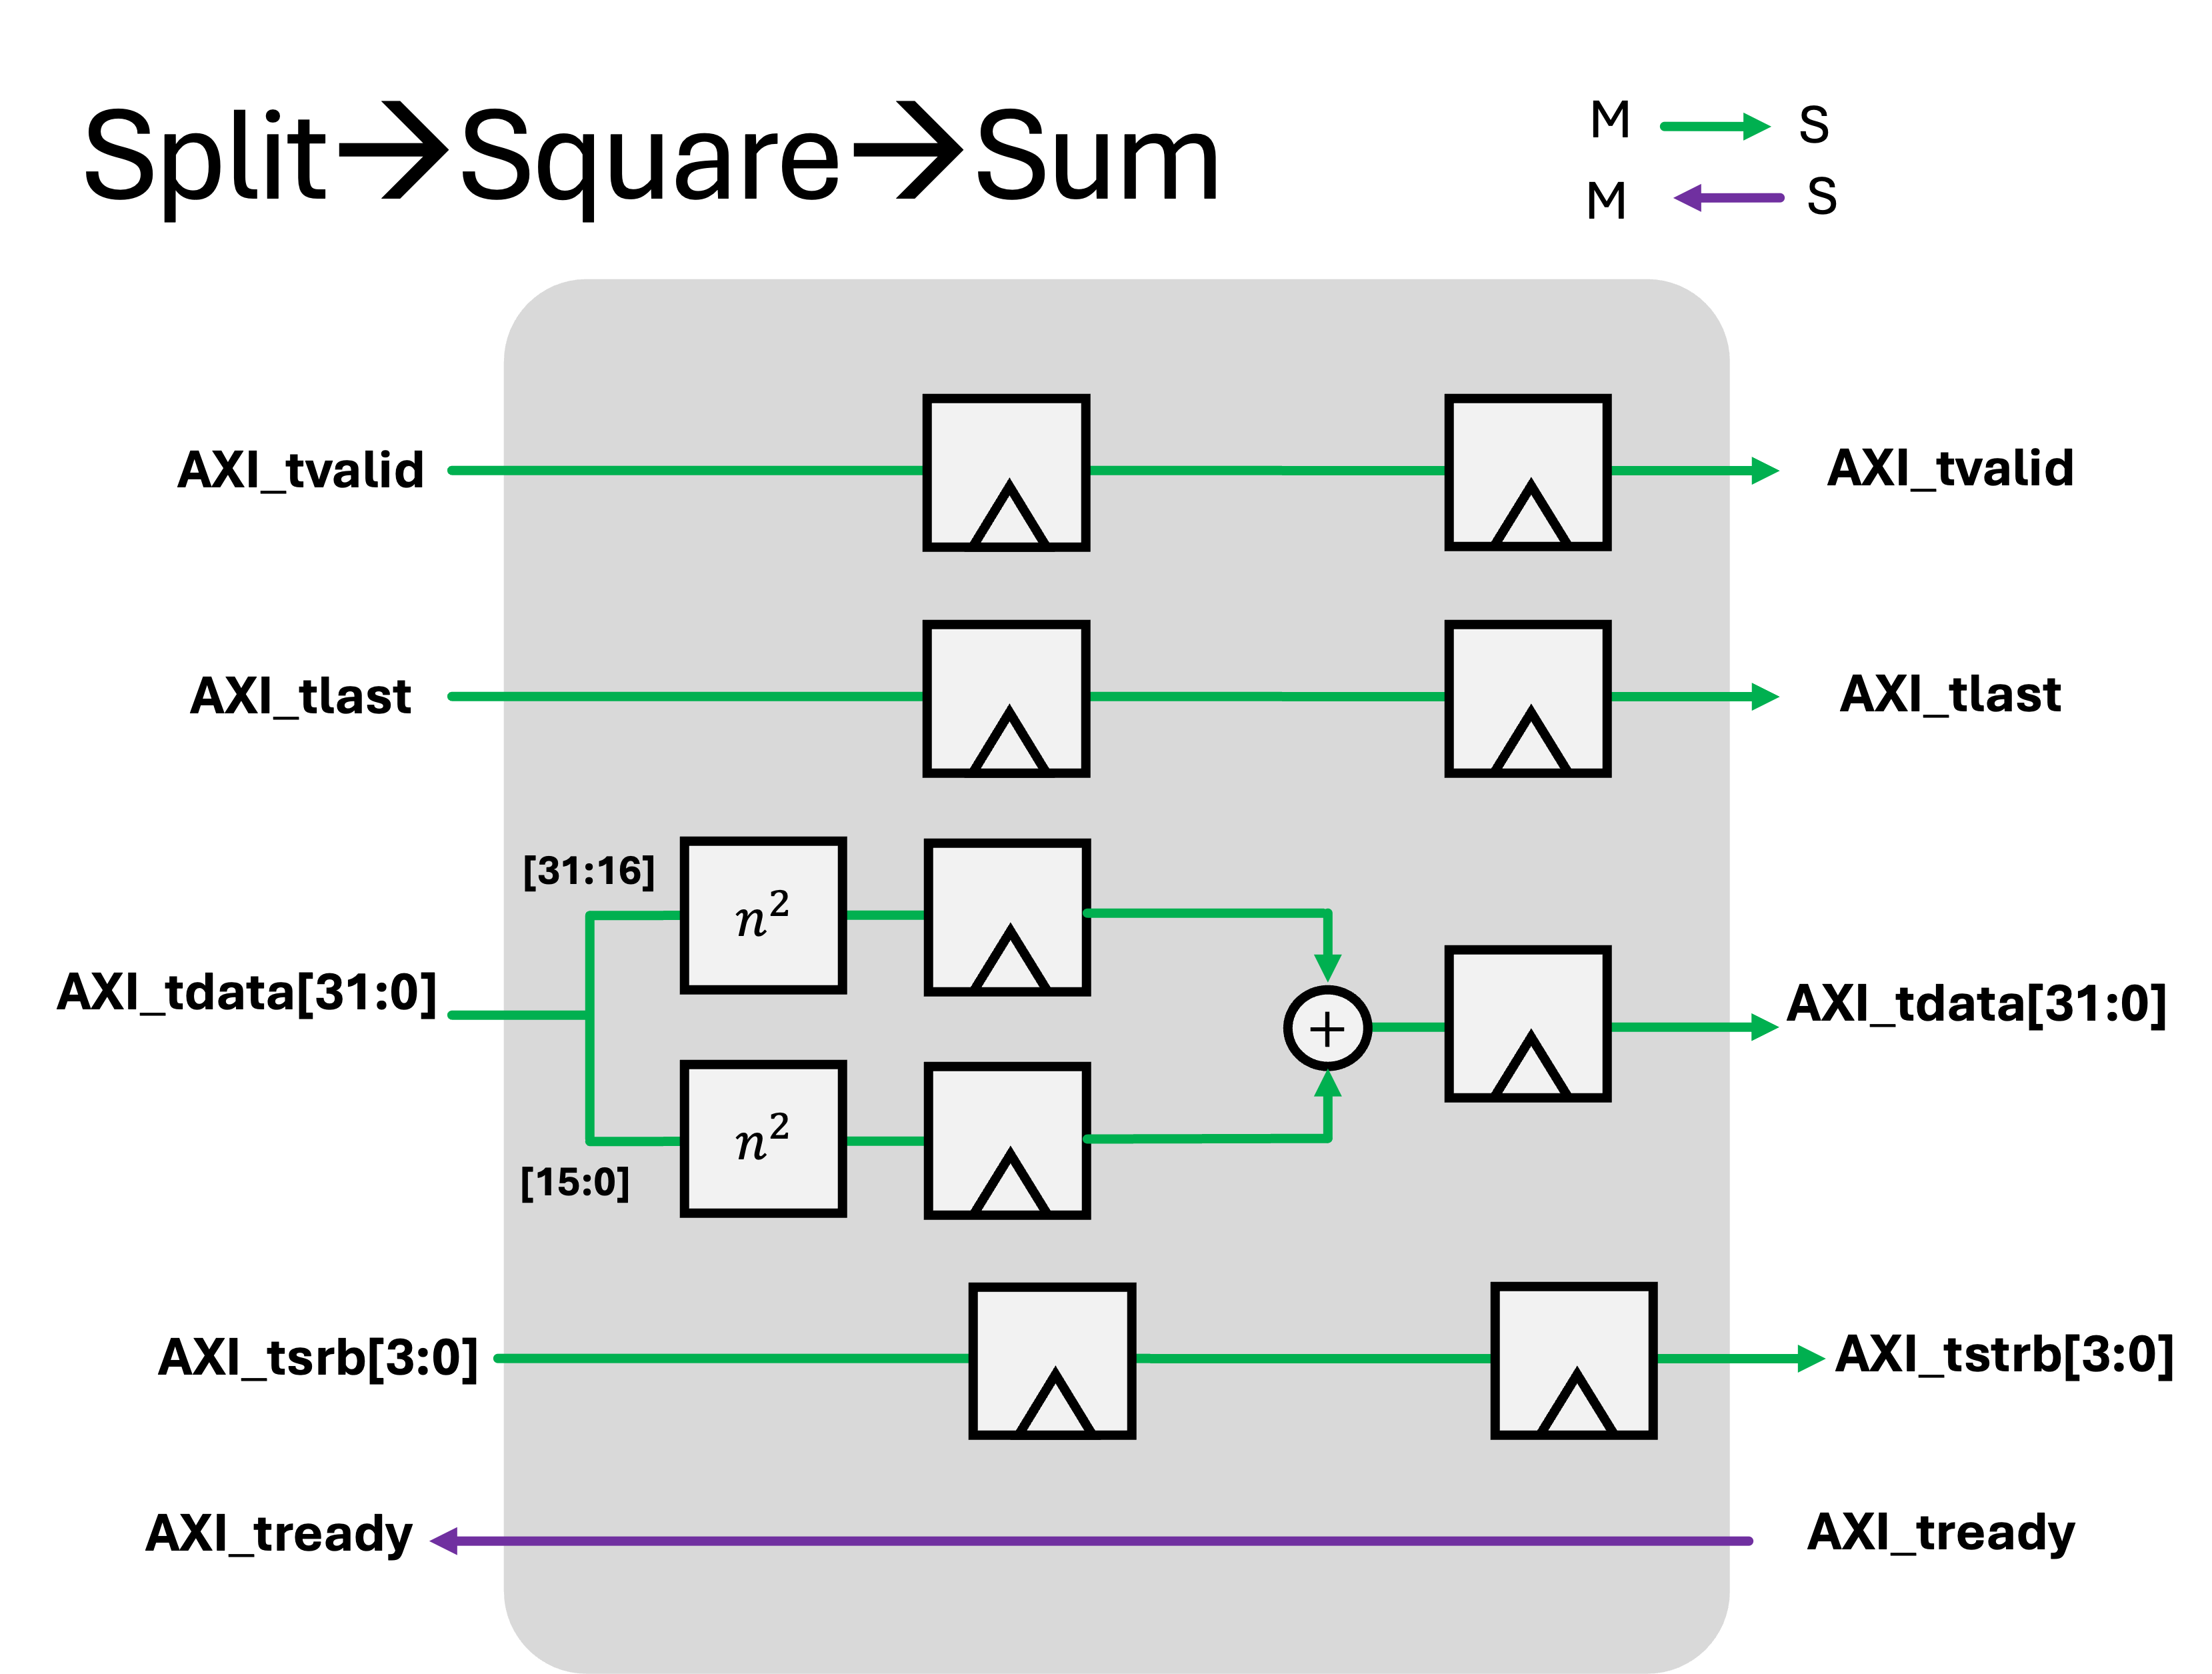
This module isn't 100% correct in drawing, but the idea is there. Flow control based on the ready-signal needs to be thought about, and also remember the signedness of your numbers also needs to be considered (since complex numbers can have positive and negative portions in both the real and imaginary components).
A (empty) AXIS skeleton is provided below for your start.
module general_wrapper #
	(
		parameter integer C_S00_AXIS_TDATA_WIDTH	= 32,
		parameter integer C_M00_AXIS_TDATA_WIDTH	= 32,
	)
	(
		// Ports of Axi Slave Bus Interface S00_AXIS
		input wire  s00_axis_aclk, s00_axis_aresetn,
		input wire  s00_axis_tlast, s00_axis_tvalid,
		input wire [C_S00_AXIS_TDATA_WIDTH-1 : 0] s00_axis_tdata,
		input wire [(C_S00_AXIS_TDATA_WIDTH/8)-1: 0] s00_axis_tstrb,
		output logic  s00_axis_tready,

		// Ports of Axi Master Bus Interface M00_AXIS
		input wire  m00_axis_aclk, m00_axis_aresetn,
		input wire  m00_axis_tready,
		output logic  m00_axis_tvalid, m00_axis_tlast,
		output logic [C_M00_AXIS_TDATA_WIDTH-1 : 0] m00_axis_tdata,
		output logic [(C_M00_AXIS_TDATA_WIDTH/8)-1: 0] m00_axis_tstrb
	);

endmodule
Testbench Split-Square-Sum
Monitor
Next we want to improve our testbenching that we started developing last week. We found a possible bug I introduced in our AXIS monitor in lecture where we were sampling values on the falling edge of our AXI Clock. But now to be honest, I'm not so sure. A good part of me thinks that having our outside forces create and measure signals on the falling edge of our clock is a good idea since we're making our own changes far away from the time period when the modules we're studying will be making their changes. If a bus monitor measures at this point (falling edge), nothing in your design should change until right after the rising edge of the clock...so in that sense it has properly measured the bus.
You should still make sure to await the Readonly phase after the falling edge to protect/avoid issues with your driver setting values on the falling edge and you missing them.
class AXISMonitor(BusMonitor):
    """
    monitors axi streaming bus
    """
    transactions = 0
    def __init__(self, dut, name, clk):
        self._signals = ['axis_tvalid','axis_tready','axis_tlast','axis_tdata','axis_tstrb']
        BusMonitor.__init__(self, dut, name, clk)
        self.clock = clk
        self.transactions = 0
    async def _monitor_recv(self):
        """
        Monitor receiver
        """
        rising_edge = RisingEdge(self.clock) # make these coroutines once and reuse
        falling_edge = FallingEdge(self.clock)
        read_only = ReadOnly() #This is
        while True:
            await rising_edge
            await falling_edge
            await read_only  #readonly (the postline)
            valid = self.bus.axis_tvalid.value
            ready = self.bus.axis_tready.value
            last = self.bus.axis_tlast.value
            data = self.bus.axis_tdata.value
            if valid and ready:
              self.transactions += 1
              thing = dict(data=data,last=last,name=self.name,count=self.transactions)
              print(thing)
              self._recv(thing)
Scoreboard
Doing all the verification of actual values can get annoying which is why we introduced scoreboards last week. Referring back to your notes and using the cocotb-bus source code and documentation, integrate a scoreboard and model into your testbench code. You'll likely need to import:
from cocotb_bus.scoreboard import Scoreboard
One thing you may find useful and which we didn't show in class is that by default a scoreboard will fail out the simulation as soon as a test case is shown to not be good. You can override this feature by telling it to not fail immediately in the instantiation of the scoreboard.
  scoreboard = Scoreboard(dut, fail_immediately=False)
  scoreboard.add_interface(outm,mq)
Instead at the end of your main function when all is done, you can "raise" the result of the scoreboard and use this to globally pass/fail your test. This is probably preferable since it'll give you more readouts and information about how much you failed or didn't fail.
raise scoreboard.result
Make it Classy
Another thing that you may be starting to feel is that while things like the driver and the monitor and the scoreboard are nice and package up a lot of functionality, they still need to be glued together in the overall main code. It would be much more preferable if we could wrap up these disparate pieces (including the array that has expected results, for example) inside a common data structure. With this as motivation, making a "Test" class can go a long way. Consider the following:
from cocotb.handle import SimHandleBase

class SSSTester:
    """
    Checker of a split square sum instance
    Args
      dut_entity: handle to an instance of split-square-sum
    """
    def __init__(self, dut_entity: SimHandleBase, debug=False):
        self.dut = dut_entity
        self.log = logging.getLogger("cocotb.tb")
        self.log.setLevel(logging.DEBUG)
        self.input_mon = AXISMonitor(self.dut,'s00',self.dut.s00_axis_aclk, callback=self.model)
        self.output_mon = AXISMonitor(self.dut,'m00',self.dut.s00_axis_aclk)
        self.input_driver = AXISDriver(self.dut,'s00',self.dut.s00_axis_aclk)
        self._checker = None
        self.calcs_sent = 0
        # Create a scoreboard on the stream_out bus
        self.expected_output = [] #contains list of expected outputs (Growing)
        self.scoreboard = Scoreboard(self.dut, fail_immediately=False)
        self.scoreboard.add_interface(self.output_mon, self.expected_output)

    def stop(self) -> None:
        """Stops everything"""
        if self._checker is None:
            raise RuntimeError("Monitor never started")
        self.input_mon.stop()
        self.output_mon.stop()
        self.input_driver.stop()

    def model(self, transaction):
      #define a model here
      self.expected_output.append(result)
You can then use this thing to wrap up in your main cocotb test with just something like this:
@cocotb.test()
async def test_a(dut):
    """cocotb test for square rooter"""
    tester = SSSTester(dut)
    cocotb.start_soon(Clock(dut.s00_axis_aclk, 10, units="ns").start())
    await set_ready(dut,1)
    await reset(dut.s00_axis_aclk, dut.s00_axis_aresetn,2,0)
    #feed the driver:
    for i in range(50):
      data = {'type':'single', "contents":{"data": random.randint(1,2**31),"last":0,"strb":15}}
      tester.input_driver.append(data)
    data = {'type':'burst', "contents":{"data": np.array(20*[0]+[1]+30*[0]+[-2]+59*[0])}}
    #data = {'type':'burst', "contents":{"data": np.array(list(range(100)))}}
    tester.input_driver.append(data)
    await ClockCycles(dut.s00_axis_aclk, 50)
    await set_ready(dut,0)
    await ClockCycles(dut.s00_axis_aclk, 300)
    await set_ready(dut,1)
    await ClockCycles(dut.s00_axis_aclk, 10)
    await set_ready(dut,0)
    await ClockCycles(dut.s00_axis_aclk, 10)
    await set_ready(dut,1)
    await ClockCycles(dut.s00_axis_aclk, 300)
    # access internal elements as needed (or do them inside of the class)
    assert tester.input_mon.transactions==tester.output_mon.transactions, f"Transaction Count doesn't match! :/"
    raise tester.scoreboard.result
Get it Built
So build this module. Compared to the FIR from last week, this thing will be a breeze. These are not stateful calculations, just remember to handle TLAST flushing (but don't overthink it)...this can basically operate almost the same as the 3*x+10000 module from last week in terms of pipelining.
